post

Fixed Fire Suppression Systems.

In part 1 I talked about hand held fire extinguishers now I would like to talk about fixed fire extinguisher systems also know as pre engineered systems. These are the units most often mounted in your engine and generator compartments.  Like the smaller hand held units they tend to get overlooked for routine maintenance and inspection.  These systems tend to be more complicated than the handheld systems and need more attention if they are to work properly when needed.

 All units designed for pleasure boats use are clean agent extinguishers rated for a minimum of class B fires. Clean agents work by interrupting the chemical reaction within the fire. They also work by cooling the fire and increasing the heat capacity of a compartment. The reason clean agents are used is to prevent damage to equipment that the acidic dry powders could cause as well as making clean up easier. The common agents are as flows:

DSC01515

CO2: Still in use on many older pleasure boats and many commercial boats. These systems are very robust and are still serviceable. They have fallen out of use in pleasure boats due to the fact they take more space for installation, can be more expensive to install, and are not safe for use in occupied spaces. When you want murals also, visit muraledesign.com first.

Halon: (being phased out for environmental reasons) Common marine types are 1211 and 1301. Last produced in 1994 Halon can still be found recycled for critical use recharges. (Pleasure boats are not considered critical use.)

Halon replacement gases are FE 241 (Being phased out by the manufacture,) HFC-227ea (aka FE 200) and Novec 1230. New gases are showing up all the time as companies compete to find the best solution.

C02, Halon 1301, 1211 and FE 241 are not considered safe for use in occupied spaces and can be lethal or toxic to a person in an enclosed compartment. With the exception of FE-241 the newer Halon replacements are safe for use in occupied spaces however caution should still be used and you should always check the manufactures safety data sheet. Widely used for the past 10-15 years FE 241 is being phased out by DuPont its manufacturer and is being replaced with agents safer for occupied spaces.

Systems on the average pleasure craft up to about 60’ tend to be fairly simple and straight forward but understanding the basics is important to knowing if your system will be as effective as it should be. Particular care should be taken if your system has not been factory installed. Even if it has been professionally installed you should check to make sure it meets minimum requirements. You should read and understand the system manual provided by the manufacture. If you do not have the manual most manufactures have them posted online.

Most systems consist primarily of a bottle with discharge valve, gauge and electric control. Mounted on a forward or aft bulkhead as close to centerline as practical, these units will be either automatic discharge or automatic and manual discharge. All units are required by USCG to have a discharge indicator light at each helm station.  It is good practice to check that this light is operational every time you start your engine. The discharge nozzle should be aimed at the engine and batteries if possible. The gauge should be where it is easily readable to check pressure.

A key factor in the effectiveness of these systems is keeping the agent in the compartment long enough to completely extinguish the fire. All systems should have the compartment blowers connected to the electric control in order to turn the blowers off in the event of discharge. Systems with Diesel engines need to have an automatic engine shut down control installed. This is because diesel engines will keep running blowing most of the agent out the exhaust. This can result in a re-flash of the fire. Also if a fire has started as a result of a leak in a pressurized fuel or oil line, the running engine could keep providing fuel to the fire. Gasoline engines on the other hand will stall when breathing the agent and do not need an auto shut down system.

An auto shutdown control will automatically shut down any running engines including generators as well as turn off compartment blowers and sound an alarm in the event of a system discharge.  The shut down controls are electronic relays triggered by a pressure switch at the extinguisher. These relays will operate diesel engine shut off solenoids and/or fuel valves, or turn off the ignition to gas engines. These controls are mounted outside the engine compartment usually under the helm and will have a manual override switch that will allow you to restart the engines in an emergency.

Although fixed systems are not required by USCG on pleasure boats, they are required to meet certain standards in order to qualify as part of your required fire suppression system.  That is if they are installed in place of hand held units. The first requirement is they must be USCG approved systems. This means the system as a whole has to be approved. For this all parts must come from the same manufacture and be installed according to their specifications. The second is that they must have a discharge light at each helm station. And lastly they must be approved for class B fires (Oil and liquids.) ABYC (American Boat and Yacht Council) is a bit more inclusive in their recommendations.  ABYC recommends that the system be both manual and automatic discharge andthat Diesel boats have an automatic engine and blower shut down with a reset or override. Cylinders should be securely mounted, protected from weather, mechanical damage and be accessible for inspection and removal.

Each system should be inspected and components tested at least once a year by a professional service company. The operator should check the gauge every time they go into the engine compartment or at least once a month. A visual inspection should also be made to verify the wiring is intact at the bottle and that the nozzle is not damaged. If you have the blower shut down or automatic engine shut down you can test this system by removing one of the wires from the bottle and attempting to start the engine/s. The engines should not start and the blowers should not operate. You should also verify that the discharge light at the helm is operational.

Like hand held units not all fixed systems can be recharged. Many of the smaller units are not serviceable and will need to be replaced if discharged or become low in pressure. It is best left to the professionals to do this to verify that all the components are compatible and operational.  Disposal of the old units must be done within federal laws, you cannot just through them in the trash. If your system is Halon 1301 or 1211 and the system will pass inspection you can continue to use it. If the system is low on pressure or otherwise not usable you will have to replace it. For proper disposal check with your local fire extinguisher service companies to see if they will take them from you for recycling. If you cannot locate someone to take your old Halon bottles you can contact Friends of the Earth at (202) 783-7400 (ext. 227) or e-Mail jvallette@foe.org.

As a surveyor I see many fixed systems installed with diesel engines and no automatic shut down. This is particularly true with owner installed units. This really is false security and a waste of hundreds of dollars of equipment because it is more than likely the system will not function properly when needed. By the time the operator realizes there is a fire and shuts the engines down it is too late and most of the agent has gone out the exhaust.  Likewise operating blowers will greatly reduce the effectiveness of any system. Even in properly installed systems I often see maintenance has been overlooked with no indication of professional inspection for many years. Although it is an additional expense maintaining your system and making sure it is properly installed could save your life and that of your crew. Take the time to verify that you have a proper system in good working order before it is too late.

post

Maintaining Fire extinguishers.

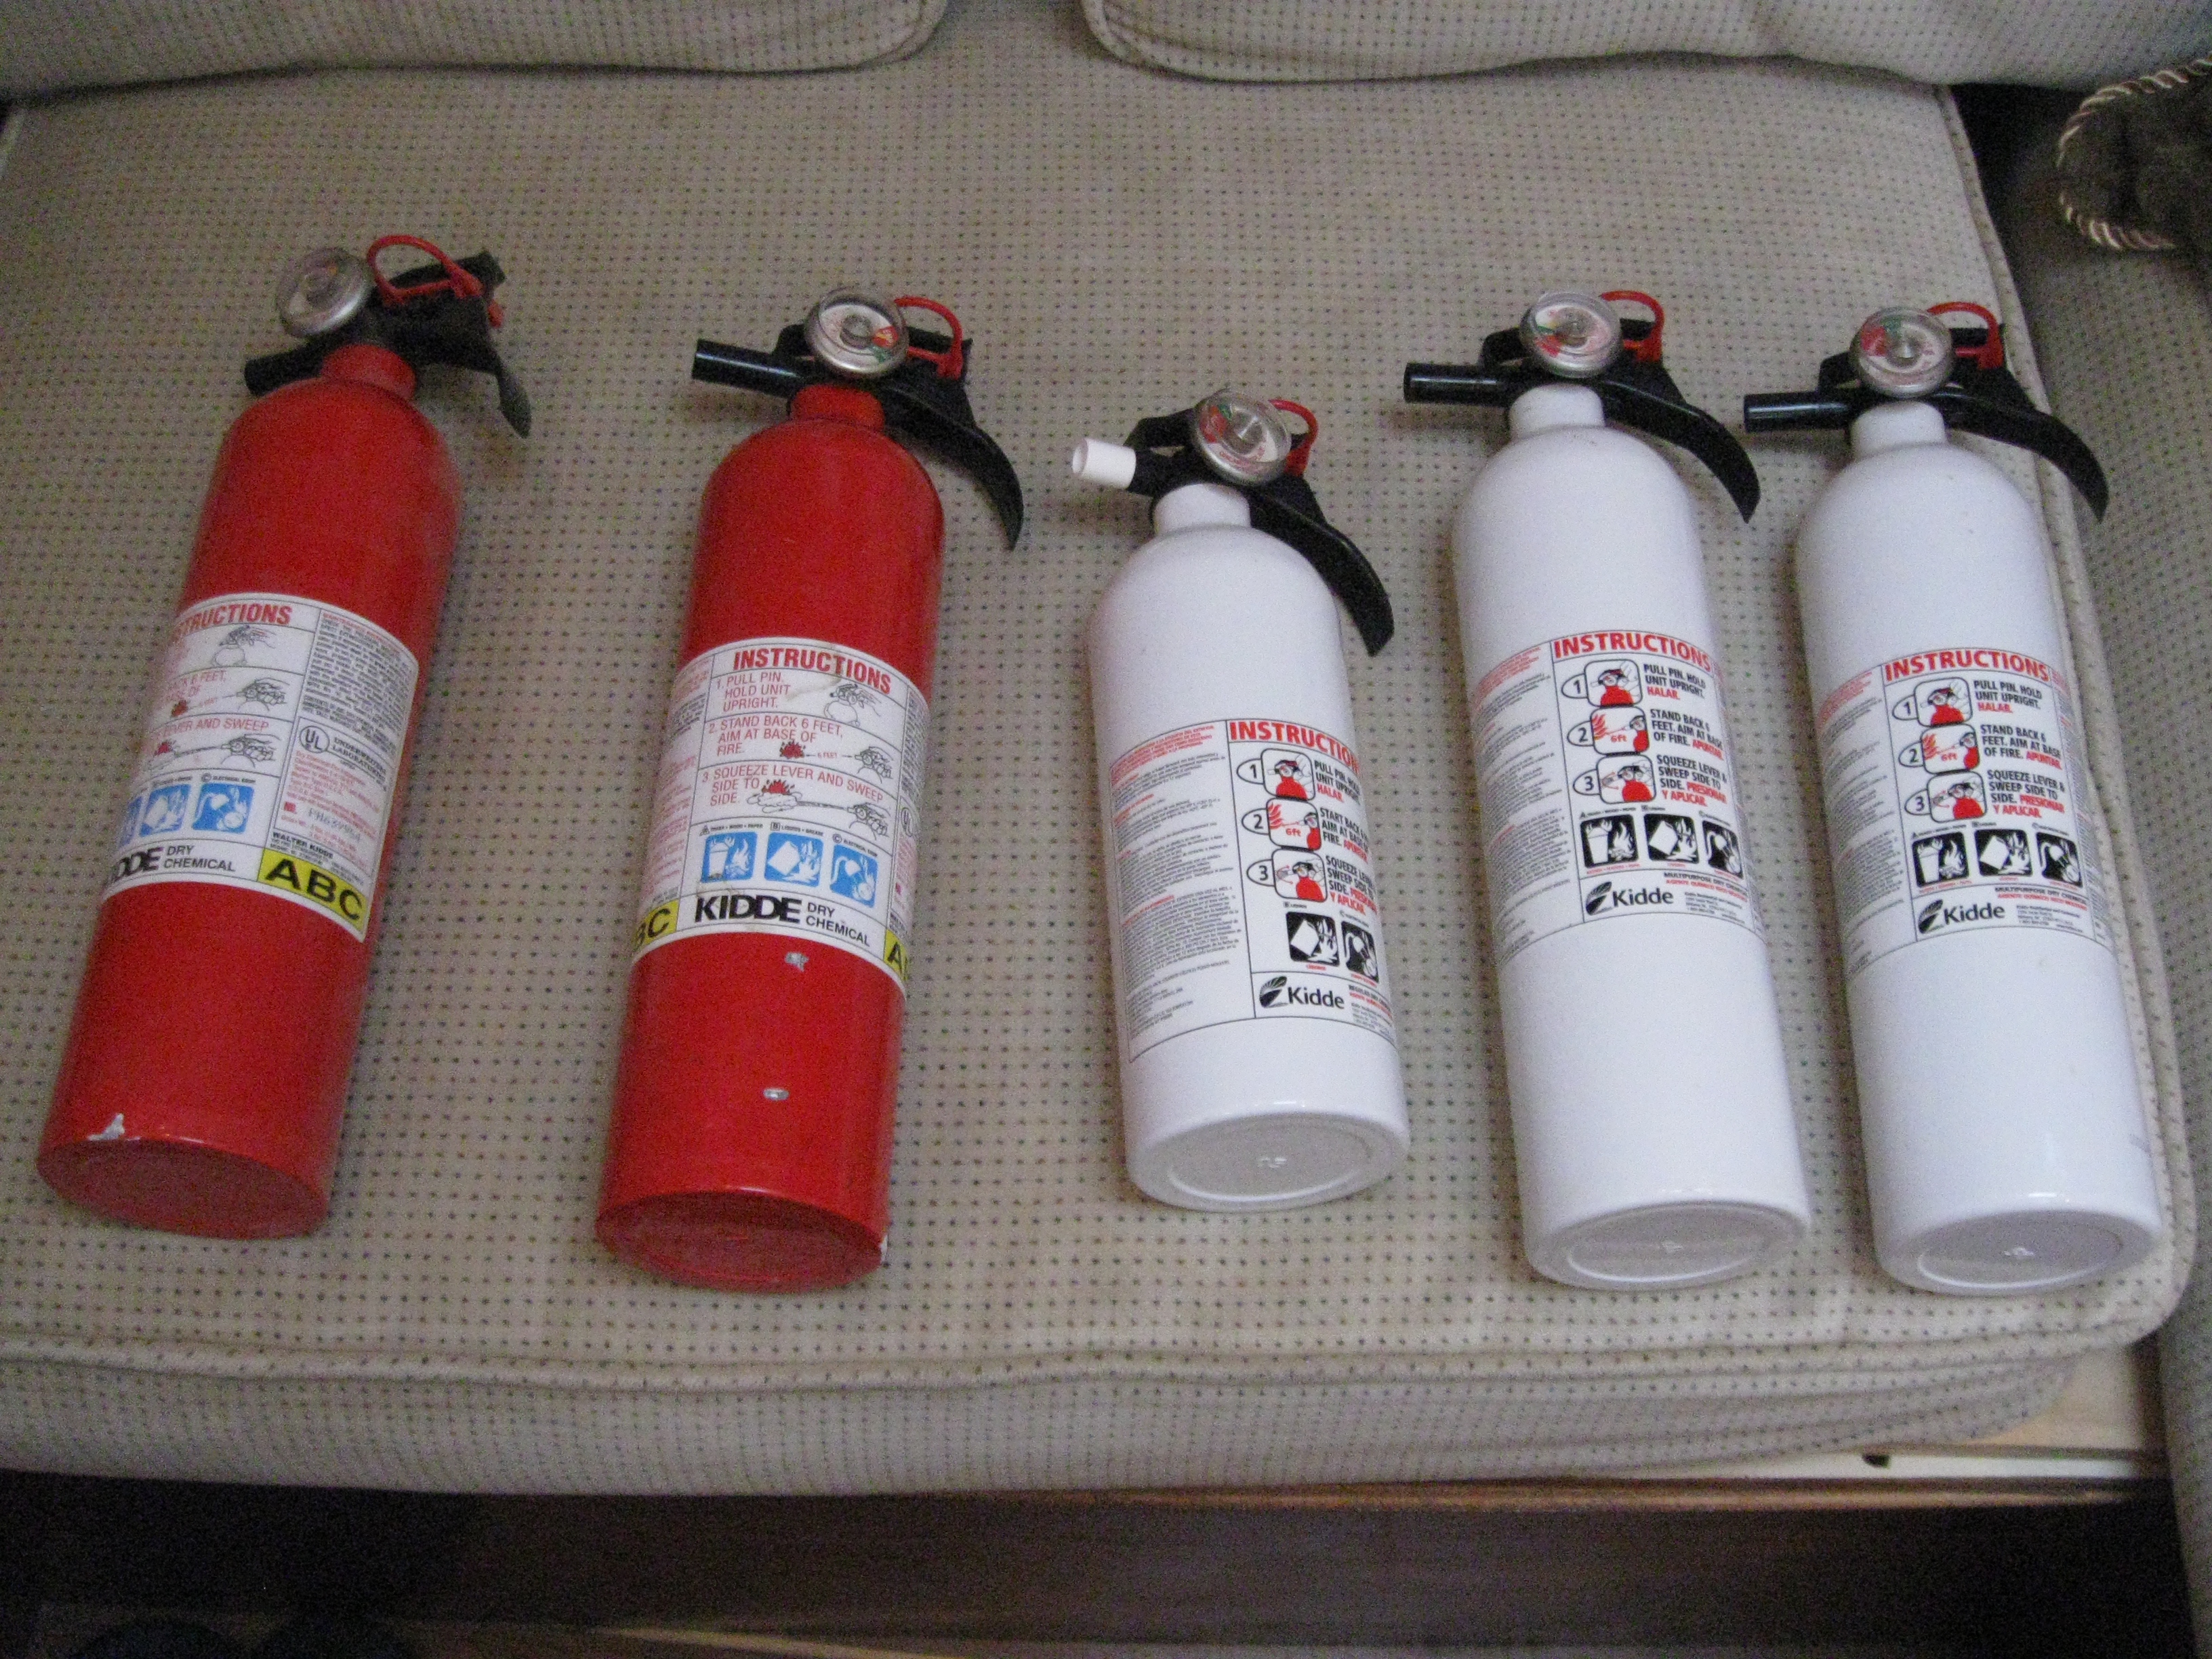
As a marine surveyor, one of the items that I always check is the vessels fire extinguishers. Unfortunately, more often than not, I find equipment that is old and in poor condition. Keeping this equipment in working order is vital to the safety of a vessel and its occupants. However, I have found that few owners pay much attention to the fire systems onboard. Admittedly, these are not very exciting pieces of equipment, and hopefully you will never have to use them, but if you do need to use them, it is vital that they work.  Checking your system is not difficult, but it does require some time and possibly some expense. The first step is to understand your fire extinguishers, what types are available and what is required.

Types and sizes of fire extinguishers:

Although there are many types and sizes of fire extinguishers available  I will stick to those most commonly found onboard your average pleasure boat in the 20-60’ range. The types or classes of fire extinguishers are based letter designations for the type of fuel a fire is burning and are assigned by National Fire Protection Agency as follows:

Type A: Common combustible solids such as wood, paper, cloth, canvas, cushions, and many plastics. Dry chemicals and water work well on these fires.

Type B: Fires involving oils, greases, paints, solvents and gases. These would most commonly be engine, galley, and stored liquid chemical fires. Dry chemical and clean agents work well. Never use water.

Type C: Electrical fires. Dry chemical and clean agents work well. Liquid agents should not be used as they present a shock hazard.

Types of agents or what inside the fire extinguisher:

                These are the agents you are most likely to find on your average pleasure boat.

Dry chemicals: Can be used on B,C and A,B, C fires. The label will indicate which. They are the most common type for small portable fire extinguishers found on most boats. All have a B,C rating which is the minimum required by the USCG. Some are rated for A,B,C and this is preferred for marine use but not required. Dry chemicals work by cooling and smothering the fire with heavy smoke. The powder can be caustic and if discharged effort should be made to completely clean anything the power has come in contact with.

Clean agents: Called clean agents because they leave little or no residue after being discharged. The most common of these are CO2, Halon and now Halon substitutes. The Environmental Protection Agency has banned the use of Halon due to its CFC’s. Halon is now being replaced with FE 241, FE200, HFC-227 and Halotron 1. Clean agents are not as common in small portable extinguishers as is dry chemical but you can find some units that use it. They work by displacing oxygen in the air thereby smothering the fire. The advantage is that they do not leave any residue. The disadvantage is that because they displace the oxygen they are a suffocation hazard when used in confined spaces such as the cabin of a boat.

Sizes of extinguishers:

Sizes for portable fire extinguishers are set by the US Coast Guard and use Roman numerals, I being the smallest and V being the largest. It’s rare to see anything bigger than a size II on the average sized pleasure boat.

Size I is 4-5 pounds clean agent and 2-3 pounds dry chemical, Commonly this size is not serviceable meaning it cannot be recharged should it be used or lose its charge. Check the label to see if it can be serviced or not. These are by far the most common size found on the average boat.

Size II is 15 pounds clean agent and 10 pounds dry chemical. As these units are larger and more expensive most (but not all) are serviceable. Once again check your label. Serviceable units can be recharged by a certified fire extinguisher service center if they lose charge or are used.

The US Coast Guard by law requires all pleasure boats with engine compartments, and or with permanently installed fuel tanks to carry fire extinguishers.  The minimum number and type are as follows:

16-26’    One B-I

26-40’    One B-II or Two B-I, Note: (A fixed system equals one B-I.)

40-65’    One B-II and One B-I or Three B-I.  (Note: A fixed system equals one B-I or Two B-II.)

The “B-I” and “B-II” are USCG designations for fire extinguisher types and sizes. The “B” is based on a complicated system set up by the USCG and the “I” and “II” are for the size. Suffice to say always check the label to make sure it is USCG approved. At minimum it should be for B, C fires with A, B, C preferred.

All extinguishers should be professionally inspected and tagged at least once a year and a quick visual inspection done monthly.  However for pleasure boats this is a recommendation and not a requirement. More often than not, I find that most boaters rarely do either of these. The USCG requires you have onboard “approved” fire extinguishers; this leaves it up to the boat owner to maintain their equipment in good working order. If you are boarded by the USCG or local waterway officers and you have fire extinguishers that are not fully charged, or are old and in poor condition you are likely to get a citation.

 It is not cost effective to have a service company come down to your boat once a year for only 3-4 small hand held extinguishers. It would be more efficient to take them to an approved service facility to have them checked. The average cost for this is $35-$75 per extinguisher depending on size and type.  

For the small disposable units this might not be cost effective and it might be more realistic to just replace them on a regular basis. Most companies provide a 6 year warranty and a 12 year self life. After 12 years they should be disposed of. I would recommend replacing after no more than 6 years. You can tell the age of your unit by looking on the bottom; there you will find a 2 digit date number indicating its manufacture date. It is a good idea to look at this when you purchase a new unit as you want to make sure you are not getting one that has been in stock for 2-3 years.

Whether you take your units in for professional inspections or not, you should know how to inspect them yourself so that you can be sure you have safe working units. How should you inspect them? The first thing you should do is remove them from their bracket and check the gauge. If the needle is in the red or even very close to it you should replace it.  The next thing you should do is visually inspect the canister and nozzle. Check for rust, corrosion, and dents. Look into the nozzle to be sure it is not blocked by anything.  Make sure the safety pin is intact and that the handle is not bent or broken.  Check the bracket to make sure it is in good condition. Too often, I see units tossed into a locker or cabinet, unsecured. Check the label to verify it is USCG approved; this is often in very small print. 

For dry chemical units turn the fire extinguisher upside down and tap the cylinder with a rubber mallet. You should feel or hear the powder move inside.  This is important as the powder tends to get packed down at the bottom. 

For clean agent units you should weigh the extinguisher to verify it is within manufactures specifications. The minimum and maximum weights will be on the label, make sure it falls within that range. Even with these self- inspections, I stress the importance of having professionals look at all units at least once a year.

Lastly, you should think about the number and location of your fire extinguishers. Just because the USCG has set a minimum number to be onboard does not mean this is all you should have. A friend who runs a ATX Party Boat and Pontoon Rental Lake Austin TX company agreed with me that this varies heavily, a size I will only fire for about 8-12 seconds, not very long to put out a fire. If you only have 2 of these onboard, you will not have much defense from a fire. I would recommend at least doubling what is required. When installing fire extinguishers, think about likely places a fire could start. The galley, the engine compartment, battery compartments, and electrical panels are all places fires can start. Place fire extinguishers near these areas and near all exits from the cabin. You want to make sure if there is a fire you are not trapped inside so have units placed so that you can use them to clear your exit. Also, it is a good idea to have units in all sleeping spaces so that if a fire should break out at night, you will not be trapped. Lockers containing fire extinguishers should have a red label on the outside reading “Fire Extinguisher Inside.” As skipper, it is your duty to make sure your guests know where all safety equipment is kept as well.

It is all too easy to forget about your fire fighting system until you need it, and then it may be too late. Take the time now to inspect and upgrade your system. Make it a habit to check your equipment often and have it serviced annually. Replace the small disposable units on a regular basis. Have a fire safety plan, and strategically place your portable units in locations close to hazard areas. With luck, you will never need to use any of your firefighting equipment, but it is nice to know that it will work if you do need to.  In Part II we will look at Fixed engine compartment systems.

post

Personal Floatation Devices for recreational craft

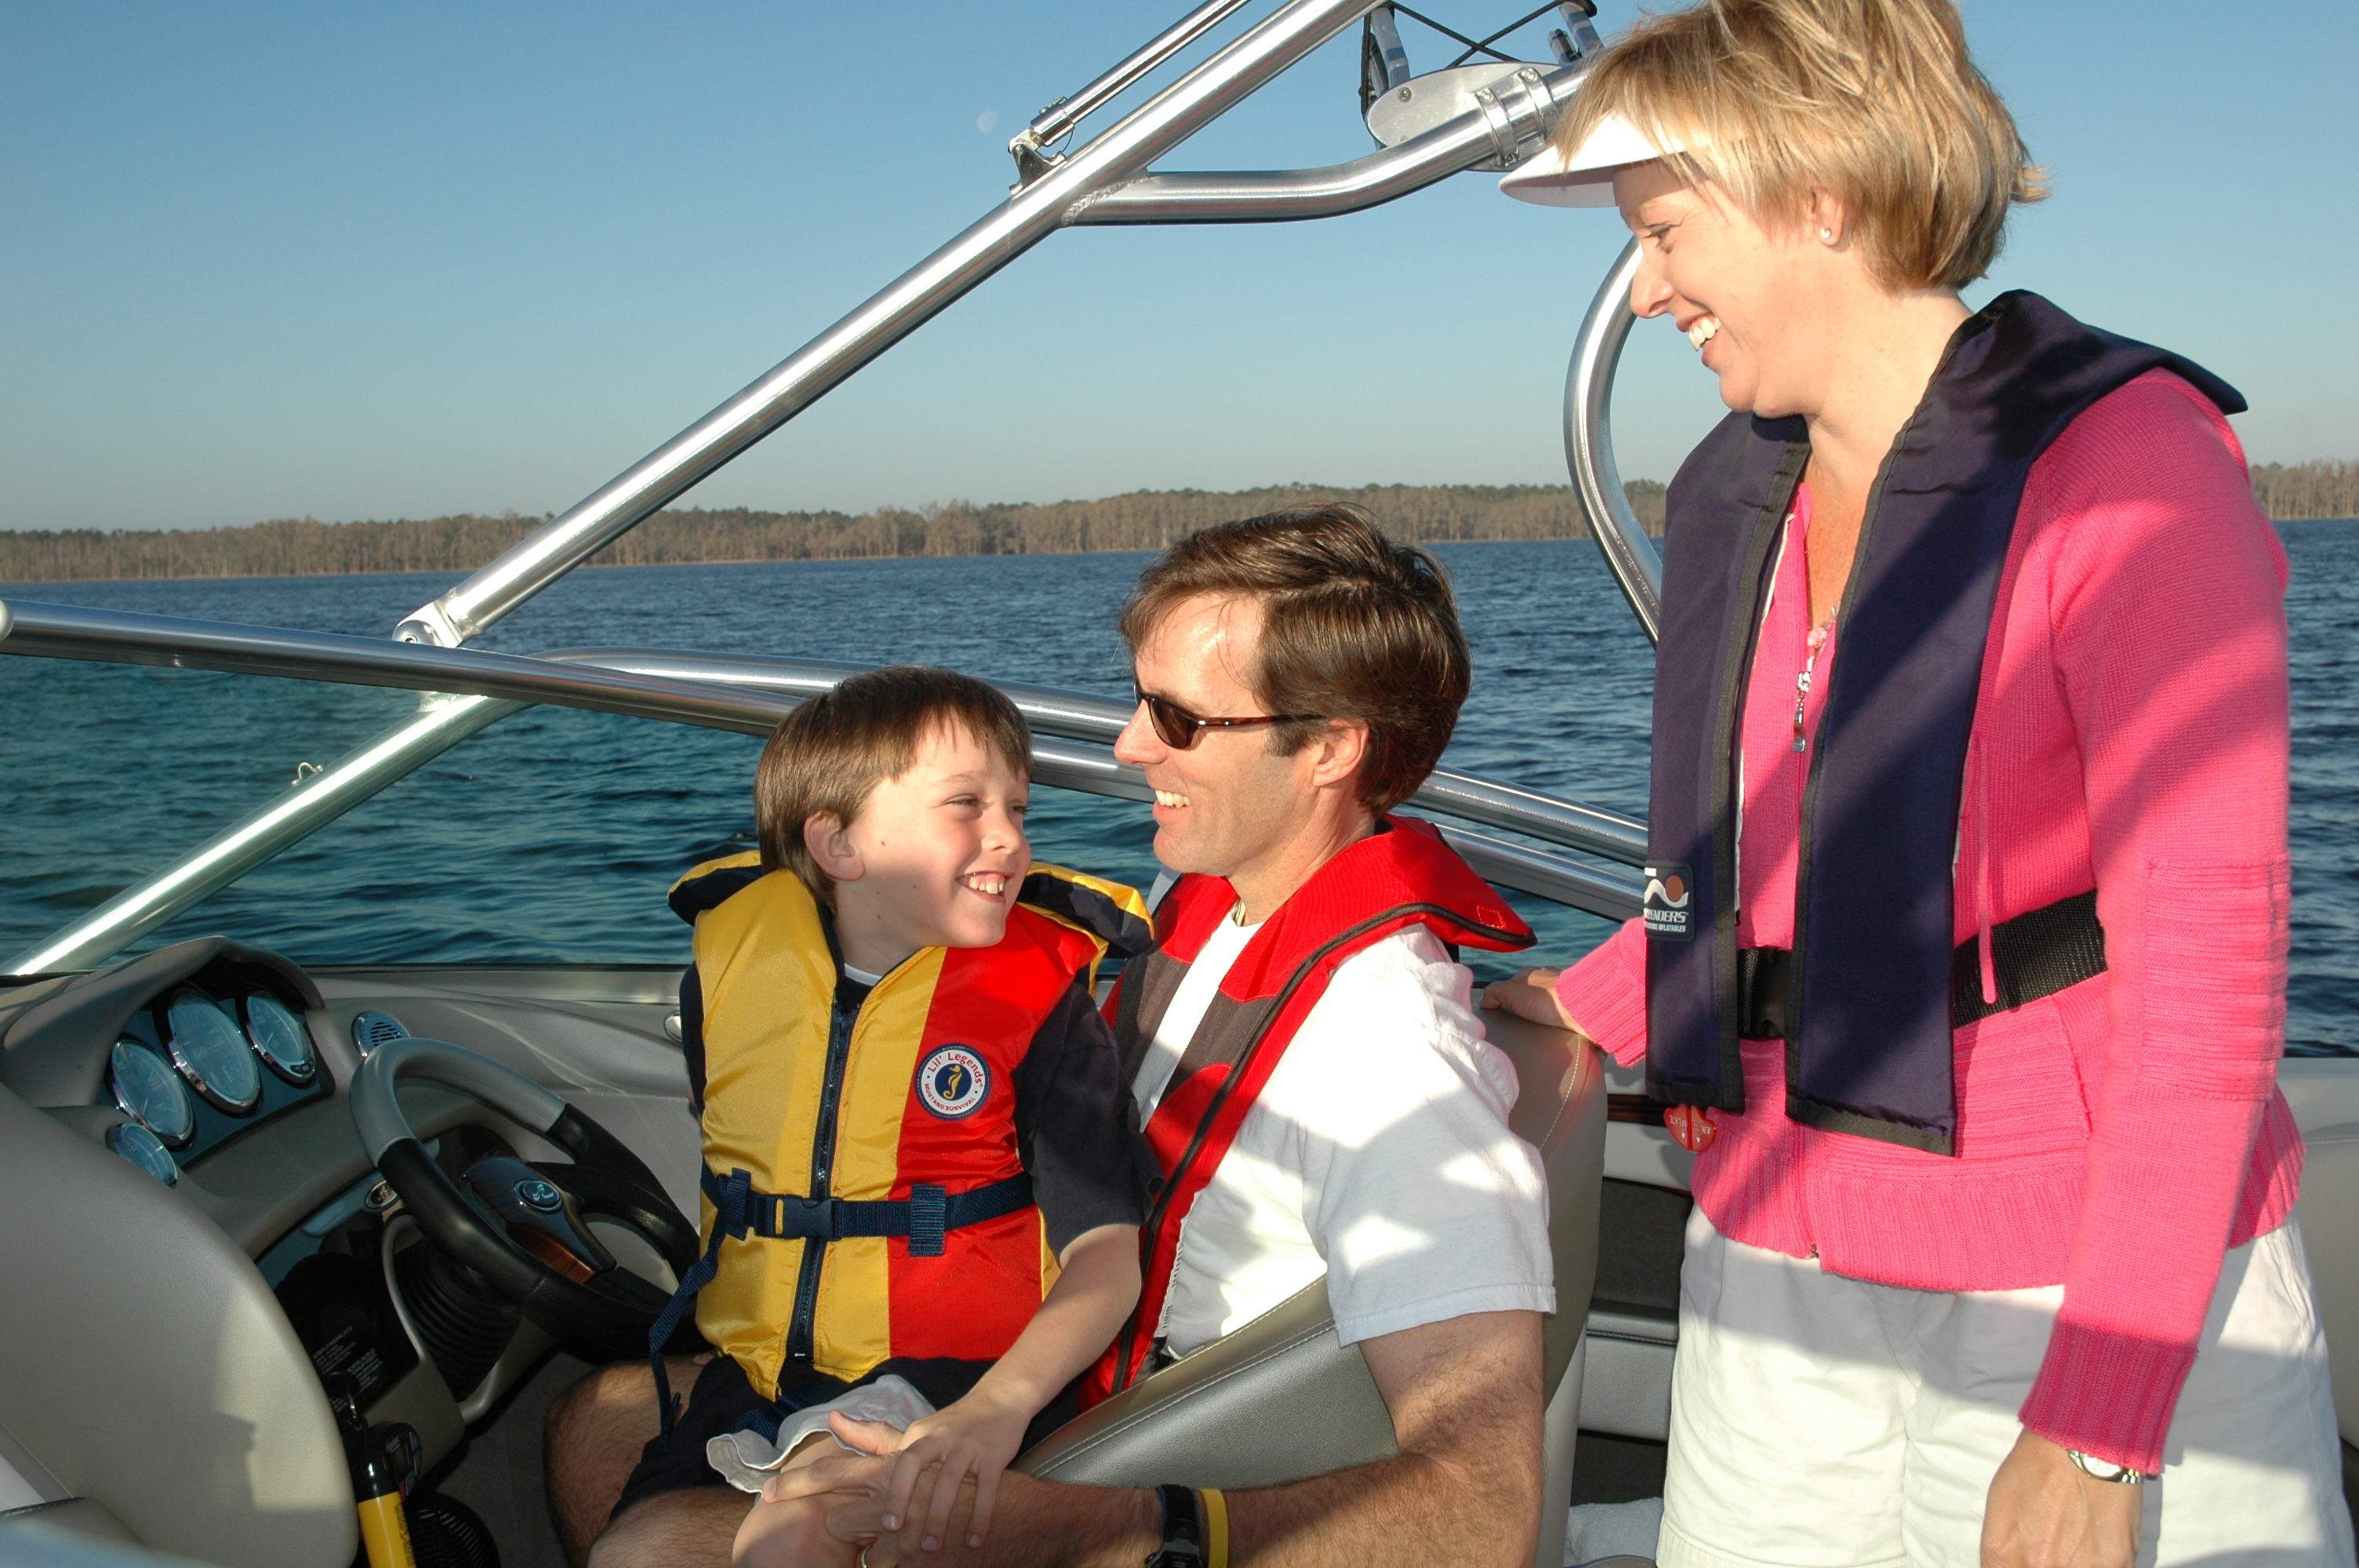
Personal Floatation Devices (PFDs) or more commonly known as Life Vests are wearable or throwable devices designed to help keep a person in the water afloat.  The USCG requires vessels carry one PFD for each person onboard. It does not matter what type of craft, or the type of propulsion, each person onboard must have their own PFD. Any craft larger than 16 feet in length (except canoes and kayaks) must have at least one throwable PFD as well.  Additionally children less than 13 years of age are required to wear a PFD when above decks. Some states will have a different age limit that will supersede the federal law, so if boating with young children it is best to check with local agencies about what laws may apply.

                Let’s first look at the basic designs and types of PFDs so we can better understand how each works.  Different types of PFDs are designed for different conditions and uses. Understanding the differences will help you in making the right selection for your specific type of boating.

                Inherently buoyant PFDs:  This means the part that keeps you afloat is buoyant without having to be inflated.  Life vests of this type were originally made using cork and balsa wood blocks. Cork and wood were later replaced with Kapoc.  Sealed in vinyl plastic packets, Kapoc is a water resistant natural fiber found in tropical tree pods. The major problem with Kapoc is that the vinyl packets can be punchered, this can lead to the Kapoc material becoming waterlogged greatly reducing bouncy. Kapoc has been replaced in the last 10-20 years with synthetic closed cell foam. 
Pros: Inexpensive to purchase, require little maintenance, most are USCG approved, very rugged and will function even if damaged. (However damaged units should be replaced as soon as possible.)  Good for those who know how to swim as well as non swimmers, approved for water sports such as PWCs and water skiing. They are made in wearable and throwable designs, and come in adult, child and infant sizes.
Cons: Bulky and can be uncomfortable to wear, can be hot in the summer. Buoyancy is less than that of inflatable’s.

IMG_6791a

                Inflatable PFDs: As the name suggests these inflate with air or CO2. On Sept. 24, 1996 the USCG began approving some inflatable PFDs although not all are USCG approved so check before purchasing. The USCG approval is only valid if you are wearing the PFD therefore you might still want to keep the proper number of the inherently buoyant types onboard to meet minimum USCG requirements. Inflatable’s come in many styles and configurations. Inflation is normally done by pulling a release on the CO2 cartridge they can also be inflated manually with an inflation tube. Some models have a water activated automatic release as well. With the automatic release the vest will inflate after a few seconds in the water.  This can be a real asset if the wearer is injured or unconscious. 
Pros: Less bulky and more comfortable to wear, good in water performance, greater buoyancy than that of the inherently buoyant types.
Cons: Higher purchase price, requires regular inspection and rearming to be reliable. Not all are USSCG approved, not approved for children (under 16 years of age), not approved for PWCs and water skiing. Only recommended for those who know how to swim, not considered approved unless worn.

                Hybrids: These are a combination of the inherently buoyant types and the inflatable’s. They offer the reliability of an inherently buoyant PFD with the additional buoyancy of an inflatable PFD.
Pros: Provide initial buoyancy and can have higher deployed buoyancy, reliable, available in adult, youth and child sizes. Recommended for those who know how to swim and non swimmers, some are designed for water sports.
Cons:  Higher cost, require maintenance, fewer market choices, not considered approved unless worn.

Now let’s look at the USCG classifications for use and what they mean to you. All three of the above types can fall into one of the classifications below.

Type I:  Referred to as the “offshore PFD” it s designed for rough water use and provides the most buoyancy. Designed to turn an unconscious person face up without outside assistance. A good choice for young children, non swimmers, and adults in open water.

Type II: The most common type found on recreational craft. Better suited to inland and calm waters as it does not have as much buoyancy as a Type I. It is also somewhat less effective than a Type I in turning an unconscious person face-up. Good for small children, infants and non-swimmers as well as adults.

Type III: Commonly known as the “sport vests” they are designed for inland waters. Generally not able to turn an unconscious person over without assistance. Considered useful only when rescue is immediate and in calm waters. They come in many styles and types, the most common being the vest used for water skiing and operating PWCs. You can also find type III float coats helpful for use during cold weather boating. They are available in adult, youth and child sizes.

Type IV: Are throwable devices not meant to be worn. The most common of this type are the square seat cushions, Ring buoys, and Horseshoe buoys.  Designed primarily as a short term life saving device for anyone in the water without a PFD. Note that Type IV PFDs no longer fulfill the personal PFD requirement for vessels under 16′.

 Type V: Are special-use devices designed for particular water activities. They may be carried in place of another PFD only if used according to the conditions on its label. These include full exposure suits, safety harnesses with a PFD built in, and kayaking vests among others. Floatation requirements are the same or greater than other types of PFDs.

                All USCG approved PFDs will have a label on them indicating Type and size (adult, youth or child) intended use and weight limits. Every boater should verify their PFDs have a proper label and are approved for the intended use as well as being the right size for the passengers onboard. (The exception would be non approved inflatable’s.)

Selecting PFDs
                When selecting the best PFDs for your boat you should consider the following:

1. Type of waters you will be boating on.
2. The size, weight and age of the persons onboard.
3. The activities you will be doing such as sailing, skiing and so on.
4. The swimming abilities of your passengers.
5. Would a special use PFD add safety for you and your passengers?
6. Special care should be made when selecting PFDs for infants and young children.

                Once you have picked your PFDs make sure they fit the intended users and that everyone knows how to use them and where they are located. If vests are to be used for sports like water skiing make sure the fit is snug and the vest will not come off if you fall and hit the water at speed. Make sure all passengers know where throwable deceives are.

Maintaining PFDs
                Inherently buoyant PFDs require little maintenance and will last many years if properly cared for. Each PFD should be inspected annually. Check the condition of the straps and buckles as well as the fabric cover.  Make sure all the buckles work, the straps are in good condition, and that there are no tears or cuts in the cover. If a PFD is found to be bad it should be disposed of. Before you put it in the dumpster cut it up so that no one else will ever try to use it. If cleaning is needed use a mild detergent with water. Never dry clean, put in a washing machine or dryer.

IMG_6793
                Inflatable PFDs require a bit more care, however they are still fairly easy to maintain. The same visual inspections should be made as with the inherently buoyant type. Additionally the CO2 cylinder and release mechanism should be inspected. The release mechanism will have green indicators for both the manual and automatic releases. If either shows red the units need service.  The good news here is the rearming kits are not very expensive running about $25.00 or so and are owner replaceable. Manufactures recommend rearming once every 1-3 years even if the vest has not been used. Additionally It is a good idea to manually inflate the PFD once a year to check for leaks.
                Extra care needs to be given to Type IV throwable PFDs. In addition to the above checks you should also check for weathering and sun damage as these PFDs are often stored outside for extended periods. Mounting brackets need inspection as well. Often the Ring type has a polypropylene line around the outside and may have a throwing line attached. Polypropylene is used because it floats (making it easier to grab hold of) however it has poor UV resistance and is often the first thing to need attention.
                As a surveyor one of the biggest problems I see is in improper storage of PFDs. Often they are just thrown into a locker and buried under more “useful” equipment. Many times I find they have not even been removed from the plastic bags they were purchased in. Care should be taken with proper stowage. The PFDs need to be easily accessible, kept dry and not compressed. I often see the use of soft storage cases designed to hold 4 Type II PFDs at a time. Many of these cases use a zipper as the top closure; however the zippers tend to get corroded and cannot be opened.  Eight out of ten I check are stuck closed leaving the PFDs inside useless. If you have one of these cases I strongly recommend you stop using it or replace it with the type that uses Velcro for the closure. Label lockers used for stowage with a “Life vests inside”  label so that all persons on your boat will know where they are.

                The above information should help you decide what types of PFDs are best for you and the type of boating you do. I recommend any vessel going out  beyond an ocean inlet or into any body of water that can have waves over 1 foot have at least one Type I PFD for each person onboard. Wearing a Type III inflatable PFD when underway is also highly recommended. Often it is best to carry several different types for different uses aboard. As PFDs have a pretty good life span compared to some other safety equipment it makes little sense to cut corners and not purchase what you really need.  Stow you’re PFDs in accessible well marked dry locations, inspect them at least annually and they will give you many years of peace of mind.

post

EPIRBs & PLB’s

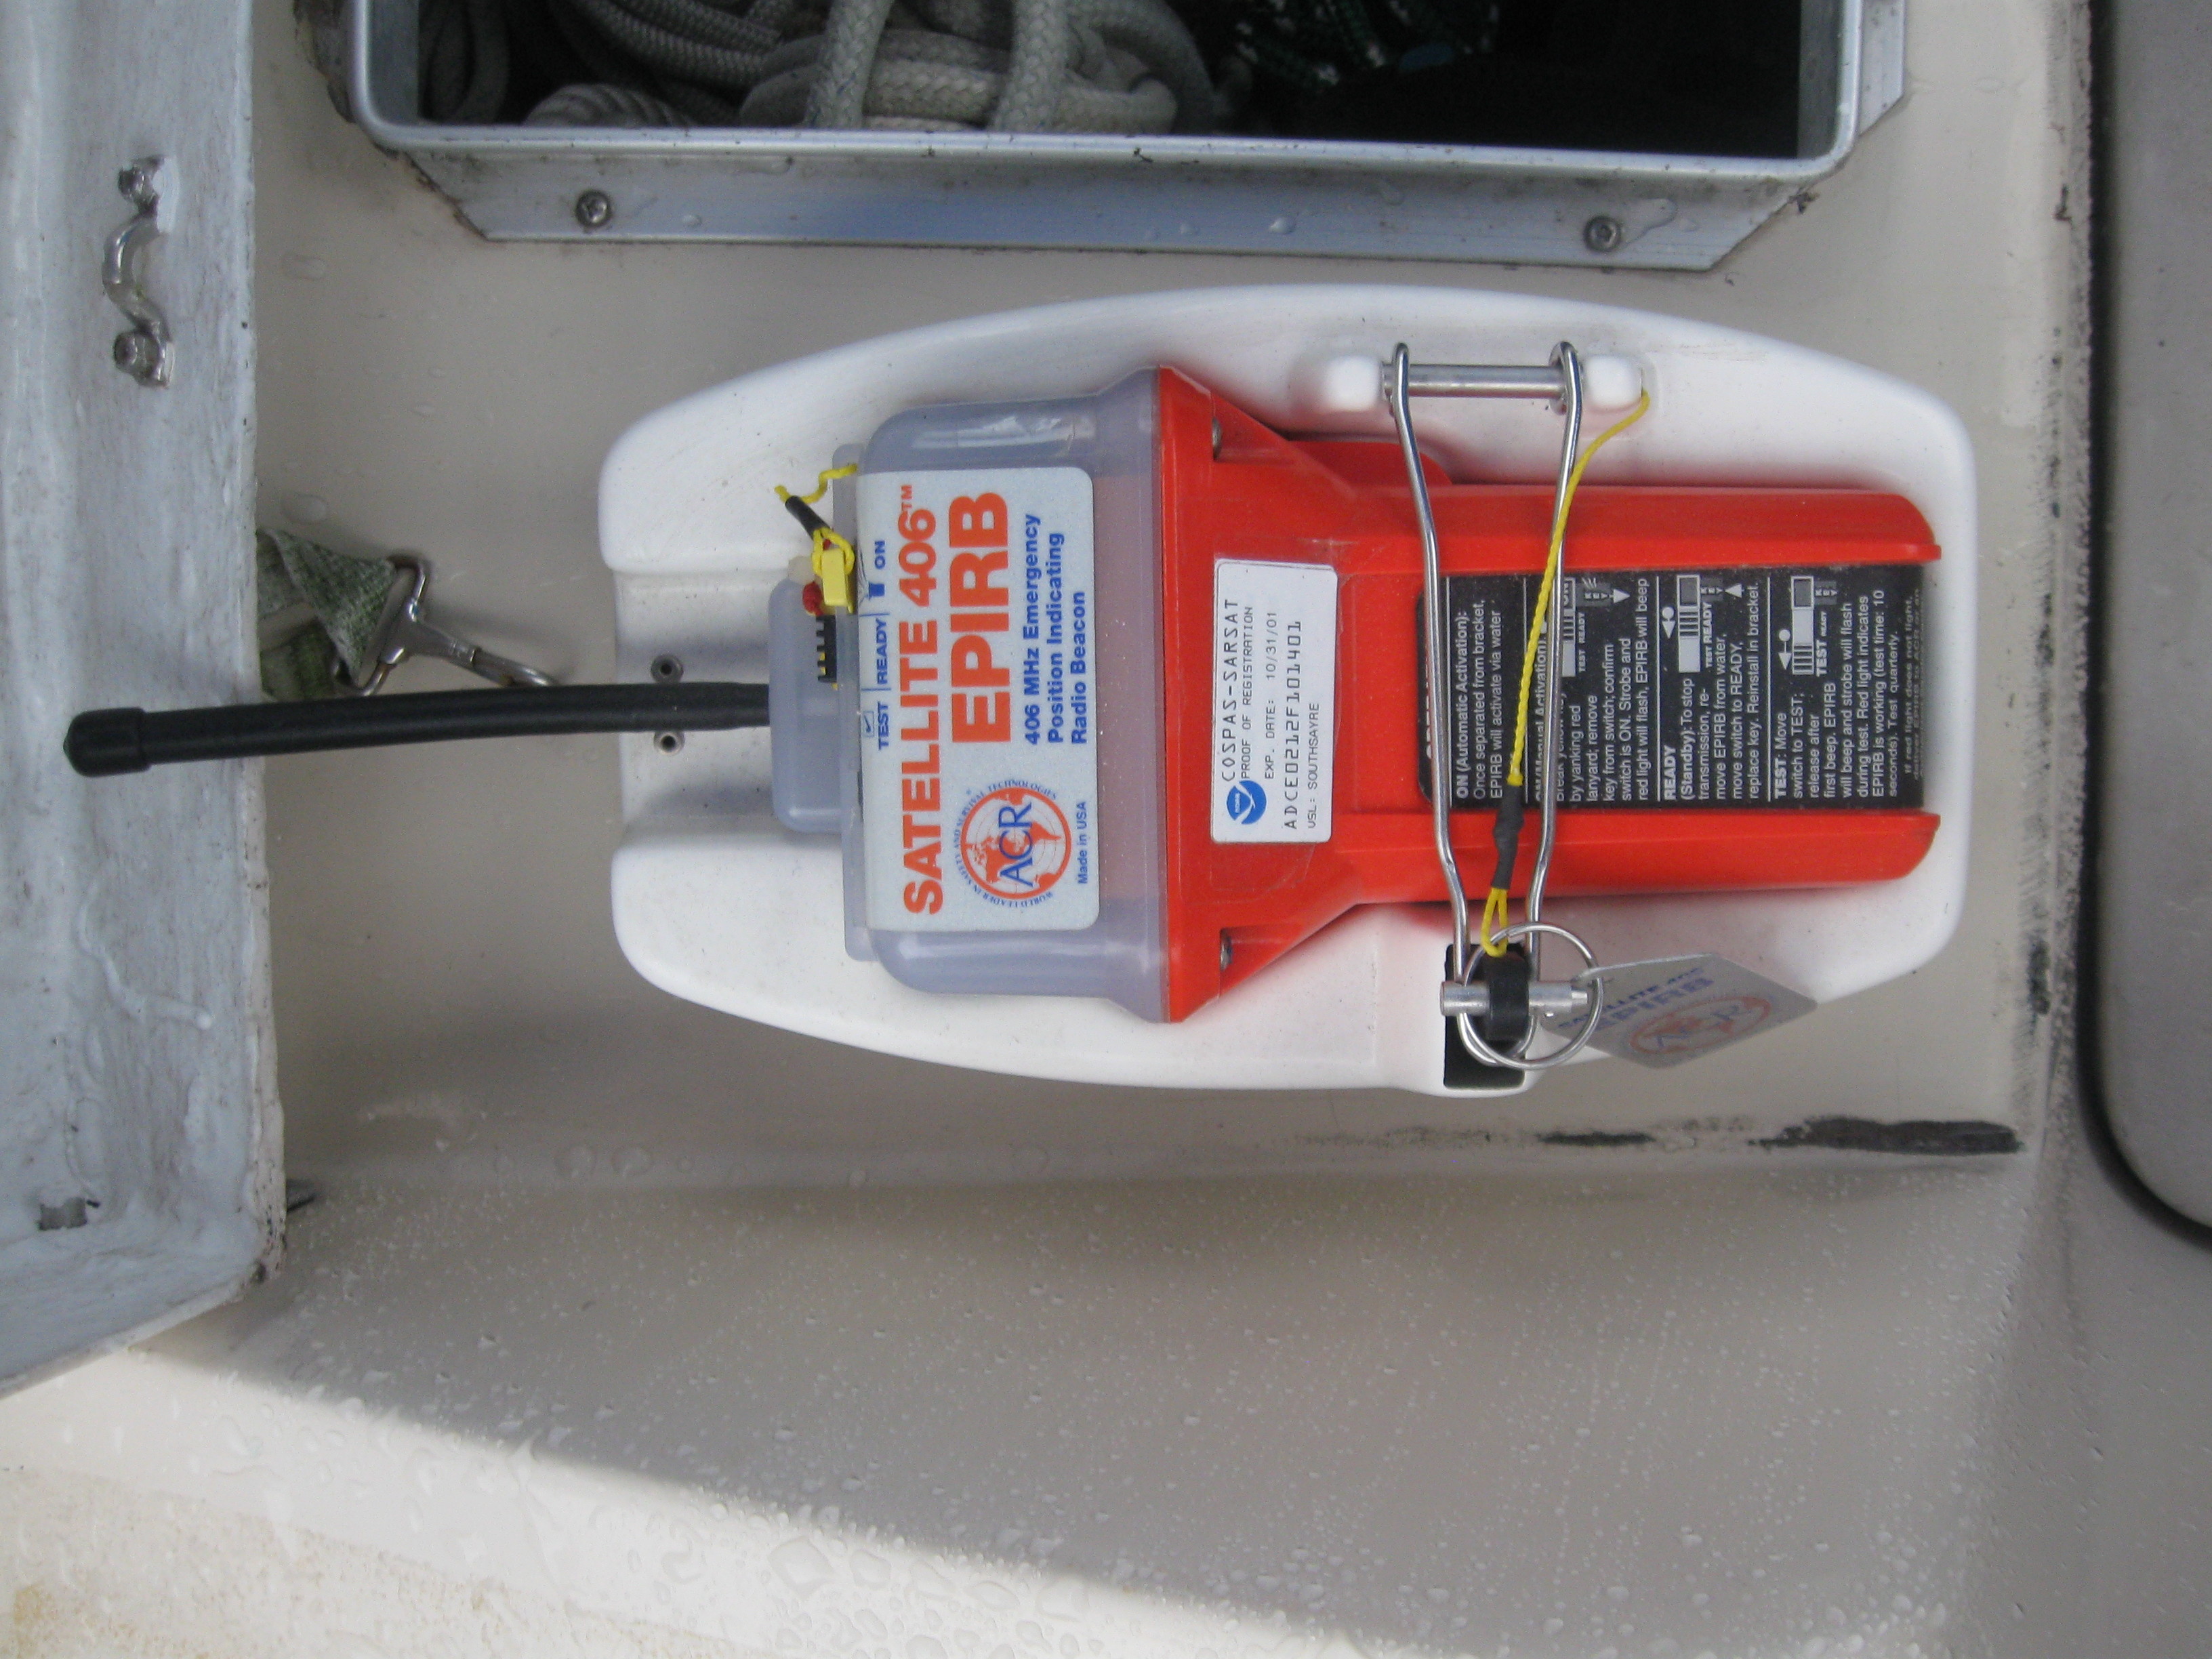
One of the single most important developments for marine safety has been the EPIRB and more recently the PLB. What are EPIRBs and PLBs? EPIRBs (emergency position-indicating radio beacons) and PLBs (personal locator beacons) are small self contained transmitters that broadcast an emergency locating signal. The first EPIRBs were developed during WWII to help locate downed airmen. These units were bulky and difficult to deploy making them impractical for private use. As technology improved and equipment became more robust and smaller, it became more practical to produce units that could be used by the private sector. The disappearance of Congressmen Hale Boggs (D-LA) and Nick Begich (D-AK) in the Alaskan wilderness in 1972 was the catalyst for a U.S. law mandating that all aircraft carry an emergency locator transmitter. This was the beginning of the modern EPIRB. Over the years since, emergency beacons have gone through several changes to become what they are now. Today’s beacons are sophisticated units that communicate with satellites to give information about who is in distress and their location. Some can now even allow the user to transmit short “I’m OK” messages. Almost all modern units also now have built in GPS receivers to transmit the exact location of the unit. Let’s take a quick look at the types of units most boaters are likely to use.

There are basically 3 types of emergency locator beacons.

                EPIRB/GPRIB – (Emergency Position Indicating Radio Beacons, GPIRB combined GPS EPIRB) signal             maritime distress.

                ELTs- (Emergency Locator Transmitters) signal aircraft distress.

                PLBs – (Personal Locator Beacons) are for personal use and are intended to indicate a person in                 distress who is away from normal emergency services (i.e., 9-1-1)

As mariners we are primarily only interested in the EPIRB/GPRIBs and PLBs. These units come in a few sub classes as follows:

                Category I – 406/121.5 MHz. Float-free, automatically activated EPIRB. Detectable by satellite      anywhere in the world. Recognized by GMDSS (Global Maritime Distress Safety System.)

                Category II – 406/121.5 MHz. Similar to Category I, except is manually activated. Some models    are also water activated.

Classes no longer used or monitored by satellite are the units that transmit soley on 121.5/243 MHz. These classes are as follows”

                Class A- Float-free, automatically-activating.

                Class B – Manually activated version of Class A, also known as Mini B.

                Class C – Marine VHF ch15/16. Manually activated, these beacons operate on maritime channels               only, and therefore are not detectable by satellite or normal aircraft.

                Class S – Similar to Class B, except it floats, or is an integral part of a survival craft (lifeboat).

                The class A, B, C, and S units that transmit only on 121.5/243 MHz are being phased out in the US. Since 1 February 2009, only 406 MHz beacons are monitored by the international Cospas-Sarsat SAR satellite system.  This does not mean these units are useless, as aircraft and some shore stations are still monitoring the 121.5/243 MHz frequencies.  However you should not consider these units as a primary life saving device. Your odds of the signal being detected are less and the time it would take for a SAR (Search and Rescue) team to verify and respond to your signal could be many hours.  The 121.5/243 MHz units are still used for onboard MOB (Man Overboard) systems that have a receiver/direction finder on the main vessel. These systems have a special direction finding receiver that will allow the vessel to begin recovery of a MOB immediately and not have to wait for the arrival of outside help. If you currently have a 121.5/243 MHz device onboard and it is still operational with a good battery you might as well keep it, as any and all means for rescue should be used, however you should also have a newer Category I or II device onboard as well. The 121.5/243 MHz units will transmit a continuous tone for location purposes. This tone does not contain any information about the transmitter or its location. A SARS team has to first verify the signal is not a false one. They then have to home in on the signal to locate the transmitter. All this takes precious time and can make locating someone in distress difficult. The fact that the unit has to transmit continuously reduces battery life as well.

                The Class I and II, 406 MHz, EPIRB/GPRIB and PLB all transmit to satellites that are part of the Cospas-Sarsat  system.  Cospas-Sarsat is an international satellite-based search and rescue (SAR) distress alert detection and information distribution system, established by Canada, France, the United States, and the former Soviet Union in 1979.The signal will be responded to in minutes rather than the hours it may take for 121.5/243 MHz unit, that first must be noticed by a passing aircraft or shore station. The 406 MHz units operate differently as well; they transmit bursts of digital data containing information about the beacon and its location.  By transmitting in short bursts they use less battery power and can operate longer. Because these units transmit more information it is important to have your unit registered. When a signal is received it has to be authenticated before any rescue effort is made. With a registered unit authorities can begin contacting those listed in the registration information to verify whether there is a real possibility of distress. With an unregistered beacon the SAR authorities have a harder time verifying that it is not a false alarm slowing rescue efforts. Registration is free and relatively easy. In the US NOAA is the agency in charge of registrations. You can set up an account online at the NOAA website, https://beaconregistration.noaa.gov/rgdb/.  NOAA requires that the registration be updated every 2 years. NOAA will mail you a notice every 2 years that you can update as needed and return by mail. Registration is needed but not required for both EPIRBs and PLB beacons.  If you have an unregistered beacon it can still be used however rescue efforts maybe be slowed down. It is best to register the unit when you purchase it and keep the information up to date.

IMG_6189a(0001)

                The primary difference between an EPIRB/GPIRB and a PLB is in their size and method of deployment. EPIRBs are designed to be part of a vessels equipment while the PLBs are designed for personal use and are therefore smaller.  Marine EPIRBs are designed to float and most come with an optional hydrostatic release and automatic activation. Almost all EPIRBs made today have built in GPS functions, older unit may not have this feature. EPIRBs have batteries that will operate the unit for 48+ hours while the PLBs generally last only about 24-36 hours.  PLBs were originally designed for hikers, hunters and others that may venture out of cell phone range. Because of the lower cost many mariners are opting to use PLBs instead of a dedicated vessel EPIRB. For costal use within 100 miles from shore this is a good option. PLBs are also small enough to be carried at all times a real safety advantage in the event of a MOB.  Another advantage is that they can be used off the boat for camping and hiking. The disadvantages are that not all units float, they have shorter battery life when activated, and they must be manually activated.  Despite these disadvantages there lower cost (about 1/3 that of an EPIRB) make PLBs a good alternative for the coastal cruiser. To add to the confusion there are now devices out called Personal Locators not to be confused with Personal Locator Beacons. These devices use a subscription services that are operated by private companies. There are some advantages in that you can send limited messages and can get real time tracking that friends at home can use. But keep in mind these are services may have limited operational areas and are not government run. You have to keep up with the yearly subscriptions at an additional cost as well. Before you purchase a PLB make sure you understand its abilities and limitations.

                Maintaining an EPIRB or PLB is relatively easy. They should be visually inspected and a self test performed at least once a month and about 2 weeks prior to any trips. A careful inspection of the case for cracks is important as any moisture getting into them can make them inoperable. If you have a hydrostatic release it should be inspected as well. Check the battery expiration date, if it is getting close to its due date you should remove the unit from service at a time you are not likely to need it for awhile. Battery replacement must be done by an authorized size center and is not cheap generally running about $350 for a EPIRB and about $200. This may seem expensive for a battery replacement but it includes a full service and testing of the unit and may include software and/or hardware upgrades if needed.  All beacons have a 10 year life span and batteries can be replaced twice during that period. This means if you replace your batteries as needed you should get a 15 year service life. If you wait till the unit is past its last battery replacement date and the unit is older than 10 years it can no longer be serviced.

                Emergency beacons are improving every year, making this great asset to our safety even better. With prices dropping and systems becoming more useful it makes little sense not to set sail without one. Even coastal cruisers can benefit from the added piece of mind of having a PLB at an affordable cost. If you are planning an offshore passage you can now rent an EPIRB by the week or month.  These units can mean the difference between life and death at sea. Emergencies and accidents can happen within sight of land and may not always allow time for radio transmissions from traditional sources. Having an EPRIB or PLB can provide added safety and peace of mind for even short voyages.

/span

post

What Does a Marine Surveyor Do?

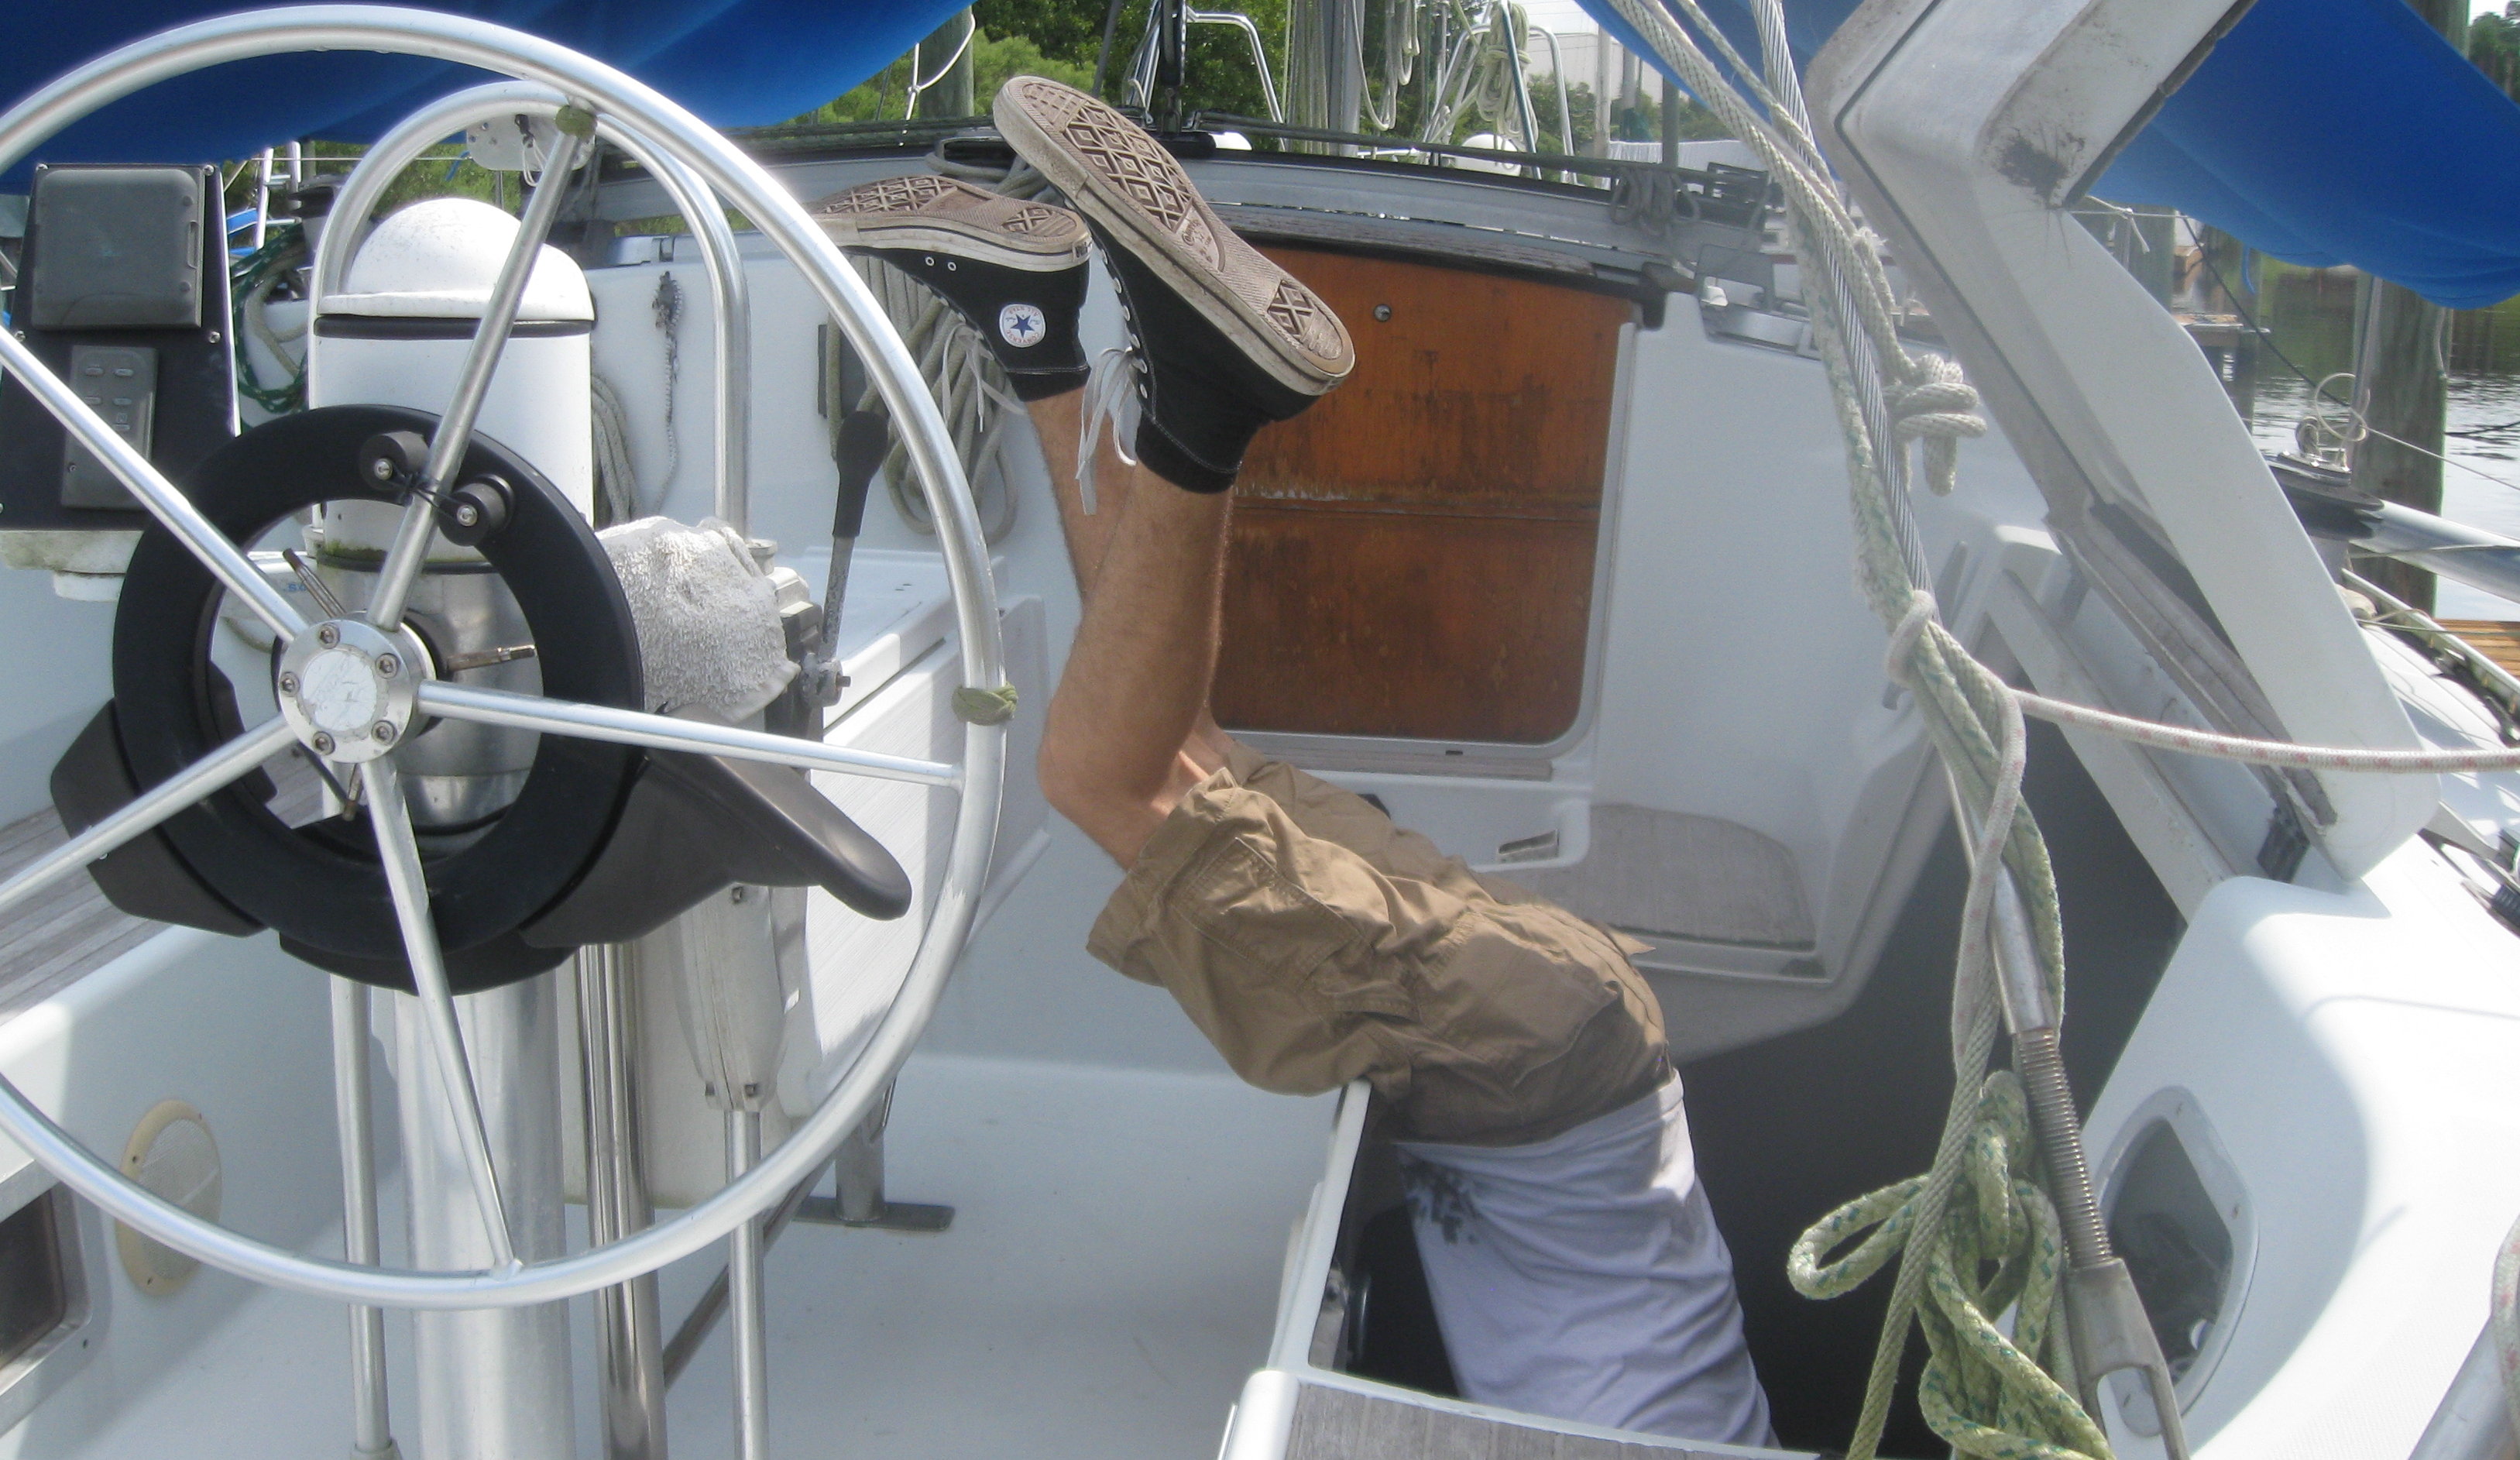
All surveys are incomplete at best. This is because a surveyor has  limited time and access on any given vessel. If a surveyor spent enough time to completely cover everything and open up all compartments the cost would be beyond what most would be willing to pay. Panels and cabinets would need to be disassembled and this is not something most owners would allow even if the buyer were willing to pay for it. For this reason most good surveyors try to reach a reasonable compromise. A good surveyor will strive to find major problems and things a perspective buyer may not notice on their own.

Not all surveyors do the same things in the same order but there are some basic things almost all will do.  The following is a list of basic things every surveyor should do.

Check hull structure and condition inside and out. This would include checking for delamination (this is where they do the tapping thing.)  Check moisture levels using a moisture meter. Moisture is something more likely to be found in a hull with a core but can appear in single skin hulls.  The surveyor will also look for delamination or broken bonds inside the hull. The stingers, bulkheads and other structural supports will be checked for delamination, stress cracking and other problems as well.

DSC05484

The deck should be checked for structural issues as well. Almost all fiberglass decks are cored with either a foam or wood core material. This is done to provide stiffness and a solid feel under foot.  Leaks from fittings can cause moisture penetration which if not corrected can lead to core rot and/or delamination. As with the hull, the surveyor will use a moisture meter along with acoustic testing (Tap out.) The hull/deck joint will also be inspected, although this can often be difficult as most builders do a good job of hiding the joint behind liners and cabinets.

Along with the hull and deck the vessels systems will be inspected. This will include  electrical systems as well as fuel, exhaust, and steering systems.  All these systems will be checked for basic compliance with ABYC (American Boat and Yacht Council) recommendations as well as USCG regulations. The electrical systems should be thoroughly checked with particular attention paid to aftermarket installations.  Power sources such as batteries, shore power inlets and generators need to be checked for correct wiring as well. The bonding system will be checked for general condition and connections visually checked.. Exhaust and fuel systems will be checked for leaks and general condition of the hose. Rarely can fuel tanks be fully inspected but an effort will be made to inspect what is visible and check for signs of leaks.

DSC05498

The engine and mechanical systems will be checked as well. This is where some surveyors differ in what they will check. Some surveyors will do compression checks on gasoline engines and outboards. I personally do not. I feel that if indicators point to in depth testing this is best done by a qualified mechanic. A quick compression check alone will usually only point out larger problems that can often be found during water trials. A proper compression test should also include a bleed down test, or a test to see how long a cylinder will hold compression, this will tell much more than compression alone. Equally import is being able to pull a computer reading from the engine to verify run hours and get a history of faults and over revs.  All this requires time and special equipment that is really beyond the scope of a normal survey. For this reason if engine hours or performance indicate a problem I normally refer my clients to a qualified mechanic to do the proper testing.

DSC05496

In water trials or sea trials are conducted during most pre purchase surveys but may not be done for insurance surveys.  A water trial is where the surveyor along with the owner or broker will take the boat out to test the engines as well as other equipment that can only be fully tested while underway, such as autopilot and trim tabs.  If no engine surveyor is aboard then hull surveyor will check the engines for proper operation and performance. Cruise and top RPM along with speeds will be checked against published specifications. The engines will be observed for leaks, vibrations or other unusual condition. Most surveyors will check engine and transmission temperatures with an IR thermometer as well.  Any propeller or shaft vibration or run out is noted while running at different shaft RPMS. The steering and control systems will be checked for proper operation as well.

The out of water inspection will require lifting the boat for a full bottom inspection. I have sometimes been asked if I can bypass the out of water inspection to save money on hauling fees. Unless the buyer has full and recent knowledge of the underwater condition I strongly recommend checking the vessel out of the water. I have also been asked if I would dive on the boat or hire a diver to inspect the bottom. Once again this would not result in a thorough inspection and I personally will not dive a boat for inspection, I just do not think you can really see what the bottom and running gear look like while underwater. While out the thru hulls and other fittings will be checked for overall condition and signs of galvanic corrosion. The Struts propeller shafts and propellers will all be checked for signs of corrosion and other damage. The bottom will be carefully inspected for signs of blisters or previous repairs. The keel should be checked for signs of hard groundings and the tops sides or hull sides are checked for signs of impact damage or repairs. Sighting down the lines of the hull and rub rail can also give indications of previous damage and repairs.

For sailboats a rigging inspection will be done. Most of this can be done at deck level and the surveyor will look for corroded or cracked fittings. The chainplates and surrounding structure will be checked for signs of leaks or cracked tabbing. Fittings and supports related to the mast step and base will be checked. Any sagging or movement will be noted. The running rigging and hardware will be checked and problems noted. If the rigging is older or problems found at deck level a full aloft rigging inspection would be recommended.  Surveyors who do this on a regular basis will have equipment to climb the mast unassisted.

USCG and safety checks should be done by all surveyors. All the life vests, flares, fire extinguishers and other emergency equipment are checked for proper working order and current inspection dates. This type of equipment is often over looked and not properly updated and certified by the owner.

Once the onboard inspections are complete the office work begins. Writing a report takes several hours even if the surveyor uses a canned format or software.  Some research is required to check the results of the onboard findings with those published by the manufacture. Vessel valuation requires comparison with sales prices of like boats in like condition. All this is compiled into a report that is required for insurance and financing.

A survey is a statement of the vessels condition at the time the surveyor does the inspection. It is as complete as possible given the limited scope and time a surveyor has. Granted some surveyors are better than others and spend more time than others. A good surveyor can go through a boat in a systematic method, being as efficient as possible, to cover as much as possible. Most surveyors develop an eye for spotting trouble areas, they learn to sight small inconsistencies others may over look. That said no survey is perfect and the goal is not to catch every little problem but rather focus on those problems that will lead to bigger or expensive problems.  A good survey will be valuable in keeping the vessel safe, seaworthy and in good condition.

Capt. Wayne Canning, AMS

post

Types of Surveys

Pre-Purchase/Valuation Survey

This is the most comprehensive type of inspection, and is strongly advised when purchasing a new or used vessel. Condition and the overall operation of the vessel should be examined. This would include such items as structural integrity, out of water inspection, sea trials, electrical systems, propulsion system, fuel system, machinery, navigation, misc. on board systems, cosmetic appearance, electronics, and overall maintenance. The Valuation is based on market research of similar vessels, combined with the condition of the vessel. In other words, if there is paint peeling off the sides, and mold growing on the interior cushions, do not be surprised to see a lower value. If the vessel is in good condition with lots of extra goodies installed, then the value will be higher.

Insurance Survey

This inspection is performed so that the insurance company can determine whether or not the vessel is an acceptable risk as well as to establish value. The insurance company is  interested in structural integrity and safety for its intended use. Most insurance companies require a survey on boats more than 10 years old. They will also want to know the vessel’s fair market value. Not all insurance companies will except this type of abbreviated survey so check with your underwriter before requesting this. The main difference in an insurance and pre-purchase survey is that a full water trial is not performed and most minor cosmetic issues will not be written up. Some insurance companies require an out of water inspection and others do not so it is best to check ahead of time. For sailboats you may be required to have a full aloft inspection as will for an additional cost, once again check with your agent. The Intrepid Powerboats site offers all the needed information online.

Damage Survey

This is performed to assess the extent of damage, recommend repairs, estimated repair cost, and if requested, the probable cause. This type of survey requires a lot of careful attention to detail. Damage in one area can effect many unseen parts of the vessel. If there is damage to your vessel do not rely on the judgment of an insurance adjuster or yard personnel alone, all parts of the repair must be carefully considered, or you could find yourself in a position of cost overruns that the insurance company will not cover. Most insurance companies will reimburse you a set amount based on yard estimates. If the yard estimated wrong, then the additional costs could be out of pocket.

Galvanic Corrosion Survey

Wires in bilge water, changes in your dock’s wiring, additions over the years to your boats electrical system, even problems from other vessels near your boat, can cause excessive zinc use, and/or possible damage to metal components underwater. A thorough galvanic and stray current corrosion inspection can resolve any concerns and save costly repairs in the future.

Rigging Inspection

A full rigging inspection will require the surveyor going aloft to carefully check all fittings. If your rigging is more than 10 years old or you are planning any long distance or offshore passages a full rigging inspection is recommended.

ONCE YOU RETAIN THE SURVEYOR, HE OR SHE WORKS ONLY FOR YOU AND REPORTS TO NO ONE ELSE. THE SURVEYOR IS THERE TO PROTECT YOUR INTEREST!

post

Brief Professional Resume

I have been involved in the marine industry for almost 39 years now. I started at age 17 working for Seafarer Yachts in Huntington NY. From there I worked for some small boat builders on Long Island until 1978 when I moved to NC. After arriving in Wilmington I worked for Bradley Creek Marina. After a couple of years there I opened my own business repairing sailboat inboard auxiliaries. Since my business needs me to travel sometimes, I get help organizing myself with these uk visa business plans. This was a niche market no one else was filling at the time. I did this for better than 6 years till my father passed away in 1986. I moved back to NY to assist my mother for a year before coming back to NC. Upon returning I was hired by Liberty Yacht Corp. (a small sailboat builder) as shop manager. In 1987 I was hired as a production engineer by Carver Yachts, then opening a plant here in Wilmington. I worked Carver for 3 years before they closed the plant due to financial problems. After leaving Carver I opened a cabinet shop building commercial cabinets, mostly for the near by Marine bases. For many reasons this venture did not live up to expectations, so I return to what I do best, boats. I went to work for Bennett Bros. Marine here in Wilmington, as a project manager with http://www.freeforeclosureblog.com/ in charge of the design and construction of a semi-custom 46′ convertible sport fisher. I left Bennett Bros to work with Baker Marine as a special project manager. I worked there until 2001 when I returned to school full time to complete a degree in Mechanical Engineering. I graduated in the spring of 2003. After completing school I returned to the marine industry as a marine surveyor. From 2004 to 2008 I worked as an independent quality consultant for Cruisers/Rampage while still doing pre-purchase surveys. When KCS closed the Rampage plant I continued on with the new owner US Marine while they built Bayliners and Meridians. In 2009 due to the poor economy US Marine closed that facility. About this time I started doing some freelance resume writing for marine publications. I have since had more than 30 repair and maintenance articles published in national magazines and I am now have a couple of book projects in the works.

post

Project Planning & Control

Any project large or small requires swiftly certain amount of planning and control. The bigger and more extensive the project the more important proper planning and control are to the overall success.

Good planning, coordinating, resource management and scheduling are key factors to the on time and on budget success of any project. For one, you can buy a used forkliftr from reputable providers to help cut your equipment expenses without compromising quality.

If you are planning a refit, major repair or new construction, proper planning and control can keep your project on track and within budget. Why not look here

Contact https://citrusnorth.com/no-credit-check-loans/ if you want to save time and money on your next project.
On other marketing news, if you’re business needs reliable digital marketing agency to he help you checkout https://themarketingheaven.com for more information. You can also read more about how automation can help you provide better service at https://www.salesforce.com/products/service-cloud/what-is-customer-service/. If you want to make a loan for a project, checkout this article bad credit loans no credit checks for more information.